DIY Hub
How to build a fernery for the side of your house

One of the quickest and easiest ways to build an attractive, practical fernery/garden cover is to use the space between your house and a side fence to create a beautiful, cool area perfect for growing. The following example is based on one 4.2 metre (13’10”) section of fence. And remember: your building plans should be approved by your local council.
Materials Required:
- 1 x 4.2m x 200mm x 50mm (13’10” x 8” x 2”) F.7 Beam
- 2 x 100mm x 100mm (4” x 4”) F.7 Posts - Height will depend on height to Fascia
- 2 x Post Support Stirrups
- 8 x 100mm x 50mm (4” x 2”) Joists
- 1 x 4.2m x 38mm x 38mm (13’10” x 11/2” x 1-1/2” F.7 Batten)
- 2 x 0.9m x 75mm x 50mm (35” x 3” x 2”) Kneebone Braces
- Premixed Concrete
- Joist Saddles
- Galvanised Nails and Coach Bolts
Instructions:
- Dig holes being careful not to encroach on boundary.
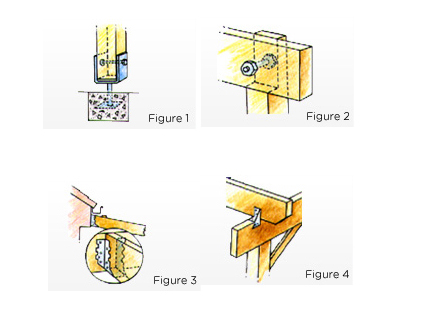
- Use galvanised steel post support stirrups to elevate posts away from ground moisture. Prepare 350mm x 350mm x 600mm (14" x 14" x 24") deep holes (based on stable soil conditions) and fill each with pre-mixed concrete (Figure 2). Simply push the steel support into the wet concrete. Allow to set and fix posts into position. As the structure is not yet fixed to the house, use temporary bracing to hold posts in position.
- Bolt the beam to the check outs in the posts (Figure 2). Using the joist saddles, fix the joists between the fascia board and the beam.
- Allowing no more than 600mm (24”) between each joist fix each joist using joist saddles. Fix batten along top of joists closest to fascia (Figure 3).
- Fix the 0.9m x 75mm x 50mm (35” x 35” x 2”) kneebone bracing at 45º angle (Figure 4).
- Using the instructions on: DIY Guide: How to install shade fabric, fix Coolaroo outdoor fabric into position and secure.

_Article-02_(Choosing-the-right-shade-sail-for-your-space)_242_164_s_c1.jpg)